-
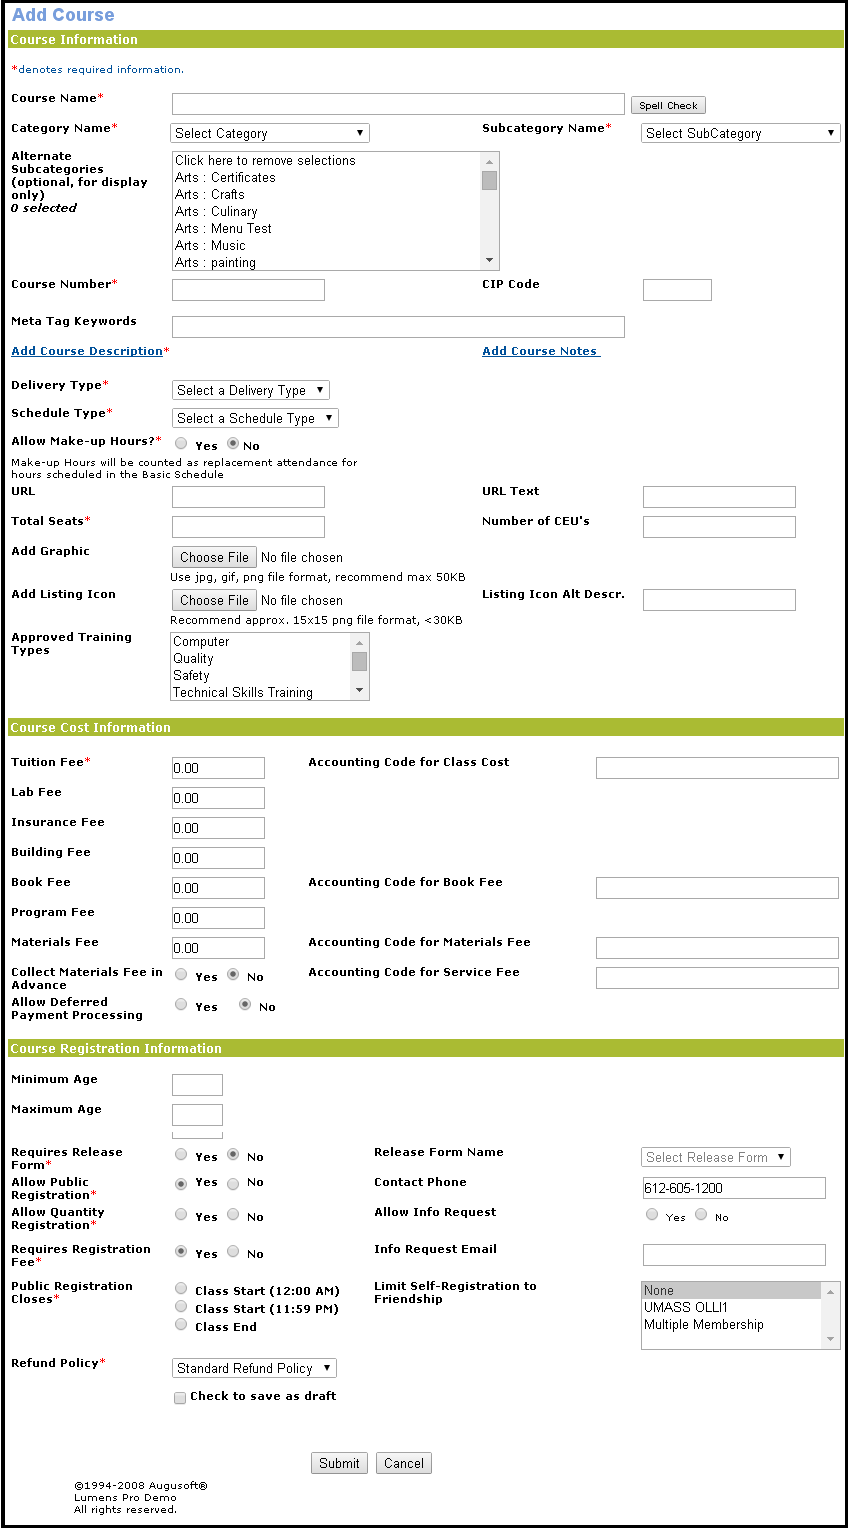
Enter a name in the Course Name field. This name appears as a link in the online course catalog, and as text in the catalog extract.
-
Select a category name from the Category Name drop-down list.
-
Select a subcategory name from the Subcategory Name drop-down list.
-
Enter the Banner code for the subject in the Banner Subject Code field.
-
Select a Delivery Type from the Delivery Type drop-down list. The options provided within the drop-down list are Classroom, online and hybrid.
-
If you choose to have automatic course numbering during your initial site setup, then the Course Number field is automatically populated based on the Base course number, but can be modified. If you chose not to have automatic course numbering, then staff must manually input a custom course number. Course numbers can be up to 10 characters long, and contain letters, numbers, stars (*) dots (.) or dashes (-).
-
Click the Add Course Description link to access a text editor where you can add the Course Description text. Click Submit to save the text and return to the Add Course screen. This description appears in the online course catalog and the catalog extract.
-
Click the Add Course Notes link to access a text editor where you can add the Course Notes text. Click Submit to save the text and return to the Add Course screen.
-
Select Yes or No for the Online Course item to determine whether the course is offered online or not.
-
Select Scheduled or Open-Ended to determine the Schedule Type offered.
-
Select Yes or No for Allow Make-up Hours?* . This would allow users to decide whether or not to allow Make-up Hours to be recorded for selected Scheduled Classes.
-
If you have designated the course as an online course, enter its URL in the URL field.
-
Enter the text for the URL in the URL Text field. The URL and URL Text fields are used by both online courses and traditional courses. For online classes, the URL text displays the web address of the course. For non-online classes, the URL text displays a link where students can access further information about the course. If the URL fields are left blank, they will not display on the online catalog.
-
Enter a number in the Total Seats field.
-
Click Browse to add a graphic file to the Add Graphic field. This graphic will represent the course.
-
If you have designated the course as an online course, enter its URL in the URL field.
-
Enter the text for the URL in the URL Text field. The URL and URL Text fields are used by both online courses and traditional courses. For online classes, the URL text displays the web address of the course. For non-online classes, the URL text displays a link where students can access further information about the course. If the URL fields are left blank, they will not display on the online catalog.
-
Approved Training Type field will allow user in aligning the Approved Training Type for Course with those for the proposals.
-
Enter an amount in the Tuition Fee field. This amount supplies the base course fee which functions as the default for a class fee.
-
Enter an amount in the Lab Fee, Insurance Fee, Building Fee, Book Fee, Materials Fee, Program Fee field.
-
Select Yes or No for the Collect Materials Fee in Advance item. This determines whether the materials fee will be collected at the time of registration, or during class.
-
Enter numbers in the Minimum age and Maximum age fields to restrict registrations to students within a specific age range. The minimum and maximum age screens allow values between 1 and 104.
-
Select Yes or No for the Requires Release Form item.* This item determines whether students under the age of 18 are required to fill out a medical release form during registration. Once added to Course, it will auto populate to classes but can be changed or disabled at the class level.
-
Select a name from the Release Form Name drop-down list.
-
The Contact Phone field will pre-populate with the phone number from the System Preferences screen and may be edited.
-
Select Yes or No for Allow Public Registration, which determines whether the class will be displayed in the public course catalog. If you select No for this field, only administrators will be able to register students for this course.
-
Select Yes or No for Allow Quantity Registrations, which determines if a single student can register multiple students for one class within a single registration process. This selection sets the default for any class beneath. This selection may be changed. See Chapter 4: Registration Options for more information.
-
Select Yes or No for the Requires Registration Fee item.
-
Select Class Start or Class End for Public Registration Closes.
-
Select a policy from the Refund Policy drop-down list. You may choose from all the refund policies created by the Power User on the Refund Policies Management screen.
-
Select from the multi-select list to assign a membership value for Limit Self-Registration to Memberships. This optional feature helps staff members to assign membership for specific courses. This allows only assigned members to register for the course's classes.
-
Counts toward Membership Benefits allows staff member to assign membership towards a course so that the course’s registration or registration payment will be counted against the Membership Benefits of the selected memberships.