STUDENTS | email to students

E-mail to Students

This option that lets you create an e-mail message to send to students. You can choose which students to include in the e-mail using several filters.


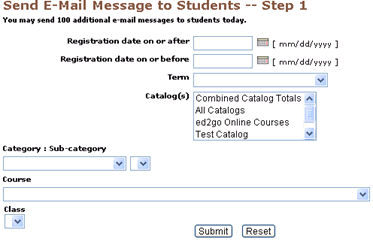
     1.  Click STUDENTS/e-mail to students.


Screen Steps


  • Registration date before or after - Fill in a range of dates in these two fields to filter students who have registrations within the date range. If you choose to filter by Registration Dates, then you cannot also filter by Terms.

  • Term - This drop-down menu contains a list of all current and expired terms. Selecting a term from the drop down will generate a list of students who registered for a class during that term. If you choose to filter by Terms, then you cannot also filter by Registration Dates.

  • Catalog(s) - This field contains a list of all active and inactive catalogs. Selecting a value, or values, from this field will generate a list of students who took a class listed in the catalog. You can multi-select catalogs by holding the Ctrl key in conjunction with your left mouse button.

  • Category, Subcategory, Course, and Class - These drop-down menus contain a list of all active and inactive categories, subcategories, courses, and classes. Selecting a value from any of these drop-down menus will generate a list of students who registered for a class contained within any of these elements. Selecting a value for subcategory overrides any value selected in the category drop down menu. Selecting a value for course overrides the subcategory and category values. Selecting a value for class overrides all above values.


     2.  Click Submit.


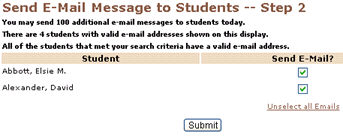
     3.  Review the list of students resulting from the Search. Next to each of their names is a check box that indicates whether they are to be

          included in this e-mail. Uncheck the box next to any student you do not want to send the message to. Click Select All to choose all

          students, or Unselect All to uncheck all students. If a student does not have an e-mail addresses in their Student Profile, then the

          message, No valid e-mail address on file will display.


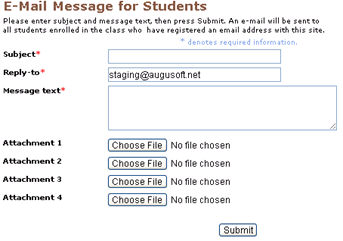
     4.  Enter the Subject, Reply-to e-mail address and Message Text. Load the attachments if needed.


     5.  Click Submit. The e-mail message will be sent to all the students selected in the previous steps.


Note: There is a daily limit of e-mails that you can send out to students. The number remaining displays at the top of the first E-mail to Students screen. If you try to send more than that number of e-mails in a given day, Lumens will not send the e-mails and alert you that you have reached your limit. If you need to change the daily e-mail limit, contact an Augusoft Customer Service representative.