STUDENTS | Members

Creating and Editing Membership Profiles

A current student can purchase memberships by placing a membership in their shopping cart. Memberships allow customers who frequently register for classes to get discounts on selected classes that offer membership discounts. Administrators can create membership profiles, too. A user can register as a student and purchase a membership at the same time. Student profiles only represent individuals. Memberships can represent several students. Each membership type has a different set of privileges associated with it, as well as a different number of associated students.

Students that are part of a membership appear on the student list with the word "member" in the status column next to their name.


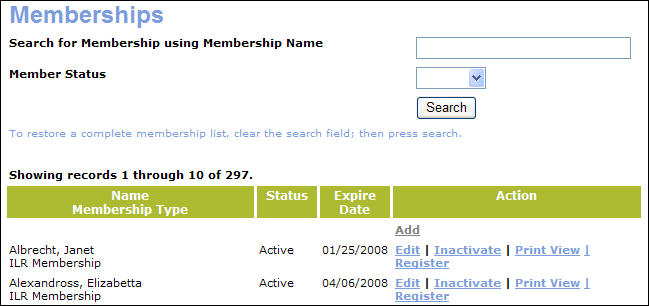
Note: Searching for a member using the Search function will also return those with "inactive" status.  There is an option to reactivate these, after which all their data and history will be restored.

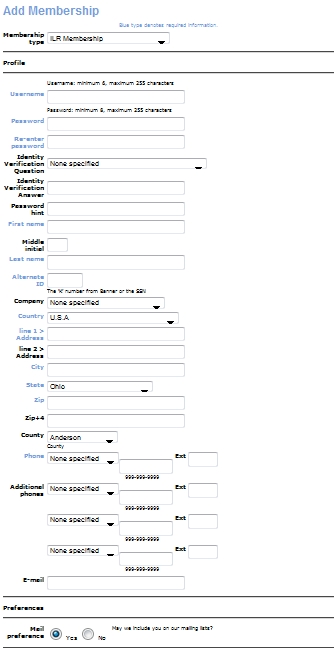
Note: When a user makes changes in an edit page, Lumens will require that the page be updated with the new changes before another user may make changes to the same page.  If another user accesses the edit page before

 the first user has submitted changes, Lumens will not allows the second user's changes to be submitted until the page is refreshed to view the first user's changes.


There are two ways for an administrator to create a membership.


To create a membership for an existing student:


  1. Click STUDENTS, student management.

  2. Locate a student on the list using the student’s last name using the search field at the top of the page; or browse the student list using the <<previous and next>> buttons on the bottom.

  3. Click the Buy Membership action link. This takes you to the first membership profile screen.

  4. Choose the type of membership to purchase from the drop down list on the 'Purchase Membership' screen.

  5. Click Submit.

  6. A membership has been placed in the shopping cart; you can continue shopping for classes or checkout.


To create a membership for one or more individuals who are not already registered:


  1. Click STUDENTS, members.

  2. Click the Add action link at the bottom of the screen.

  3. Choose the type of membership to purchase from the drop down list.

  4. Click Submit.

  5. A membership has been placed in the shopping cart; you can continue shopping for classes or checkout.


To add a member to a multiple membership:


  1. Click STUDENTS - members.

  2. Locate a membership on the list. Click the Edit action.

  3. Review the list of members that are associated with the membership. If the maximum number of members for this membership type has not been reached, there will be a Create Member Profiles action link above the list of members.

  4. Click the Create Member Profiles action link.

  5. Fill in all required fields.

  6. Click Submit. The new member has been added and will appear on student lists. The new member can register online and receives member prices. Members share the login name and password that was assigned to the membership.


Note: You will be able to add a member only if the current number of members is less than the maximum allowed for this type. Students and staff administrator can also add members to a membership in the shopping cart during registration.


Editing a Membership Type


Note:

  • Membership Benefits column would be displayed only if the duration is given in terms and more than one term needs to be concurrently active. If so, each term having an active status would be displayed as a single row.

  • Renew Membership link would be displayed only if the specified member has Membership Expires enabled as Yes in addition to the duration of membership enabled in Month(s).

  • Early Renewal Deadline would be the combined added value of Early Renewal In Months and Membership Start Date.


Note:

  • Membership Benefit limits would be displayed to a member having Membership Benefits equal to ‘Members May Take’. However for display purposes, X<= Classes Per and Y>=0; where X= Number of classes registered using membership benefits and Y= [Classes Per] - X.

  • In case of Members May Spend, X denotes the value of classes registered by members using membership benefits and Y= [Cash Equivalence Per] - X.


To create a membership for an individual who does not already have a profile:


  1. Click STUDENTS - members.

  2. Click the Add action link at the top of the Action column.

  3. Fill in all required fields.

  4. Click Submit. The new member has been added, will appear on student lists, can register online and receives member prices.


Defining Terms

  • Identity Verification Question - This is a required field in which you select a question that will allow you to verify your identity if you forget your password.

  • Identity Verification Answer - This is the answer to the Identity Verification Question.  It must be alpha-numeric and a maximum of 50 characters.

  • When editing a member profile, changing the First Name, Last Name, address or phone number fields gives you the option of applying the name change to all the member's class records.  Selecting Yes for this option updates the member profile, all the registration records for the member and the member's Accounts Receivable account.  Selecting No updates only the member profile.  Selecting Cancel will not update any records.


Note

  • User-name field for Students that already have e-mail address as their user-name would not be displayed where as additional validations will be performed when the e-mail field is edited.

  • An option will be provided to make e-mail as user-name for Students whose e-mail address is ≠ to Username. The validations will be also performed accordingly.