Canceling or Confirming a Class
The Go/No Go report allows you to confirm or cancel a class. It is very important to confirm those classes that you plan to hold.
-
Only classes that have been confirmed display on the Action Items and What's Happening reports.
-
Only classes that have been confirmed can change their status to 'run' when the class end date has passed.
-
Only classes that have run will be displayed on student transcripts.
Once you have created a class, it will be open for registration by students through online and mailed in registrations. However, depending on how many students register, or in the event of unforeseen circumstances like an instructor’s illness, you may need to cancel a class. Additionally, you need to confirm classes for them to run properly on Lumens. If classes do not run properly, then several other functions within Lumens are affected. Classes that have not run will not show up on some reports, student transcripts, or Instructor Earnings management screens. Canceled classes are removed from the online course catalog and the Go/No Go report and are displayed in the Action items report for 60 days following the class end date. After you cancel a class it will be included in the Action Items report, which lists all classes within a given term that have been cancelled or confirmed.
Go Number denotes the number of registrations necessary for a class to break even with the cost of paying the instructor. If a class has reached its Go Number then the Go? column will show Yes. You can confirm a class that has not reached its Go Number, and you can cancel a class that has.
If you have set the system option for “Send reminders to students when class is confirmed” to Yes in the system preferences, the system automatically sends a Student reminder e-mail to any student who has an e-mail address and has registered for the class. E-mails are not automatically sent out when a class is cancelled.
|

|
|
Important: Make sure to double check that you have clicked the correct option for the correct class. There is no way for an administrator to change a class's status once it has been confirmed or cancelled. Make sure that only one option is checked. If you check both confirm and cancel for a class, the class will be cancelled. Once you have chosen the correct options, submit the form.
|
1. Click CLASS INFO, go/no go.
-
Fill in the appropriate search criteria (explained in Go/No Go-->Search for Classes topic). Either the date range or the term field must be completed.
-
A list of classes is displayed.
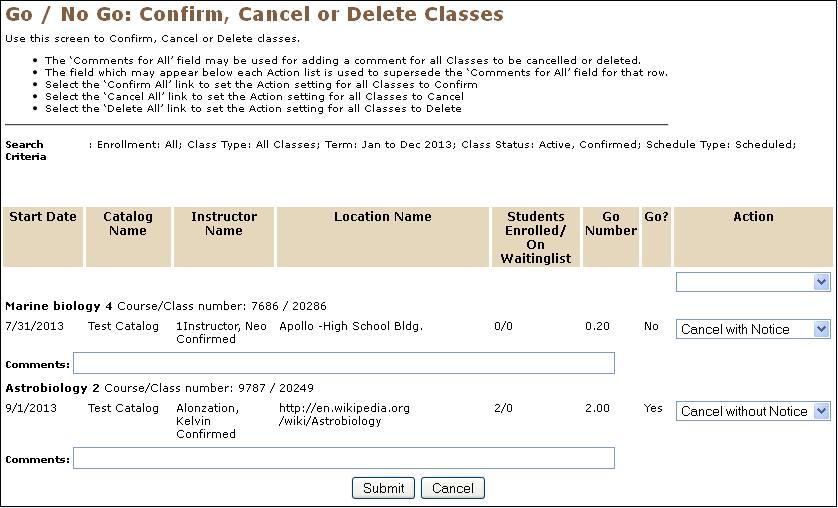
"Yes" is displayed if a class reaches its Go number of enrollment.
In the image given below, the students enrolled is ' 3' and the go number is ' 1 '.
So, Yes is displayed, click Confirm in the drop-down dialog box.
"No" is displayed if a class is not meeting its Go number of enrollment.
In the image given below, the students enrolled is ' 0 ' and the go number is ' 1 '.
So, No is displayed, click Cancel in the drop-down dialog box.
|
|
|
Note: The Not Confirmed indicates that the instructor is not confirmed; this notification does not apply to the class being confirmed or not.
|
4. Click Submit. This is how you can change the status of the class individually. For Individual class status change, options will be: Cancel,
Confirm, Delete.
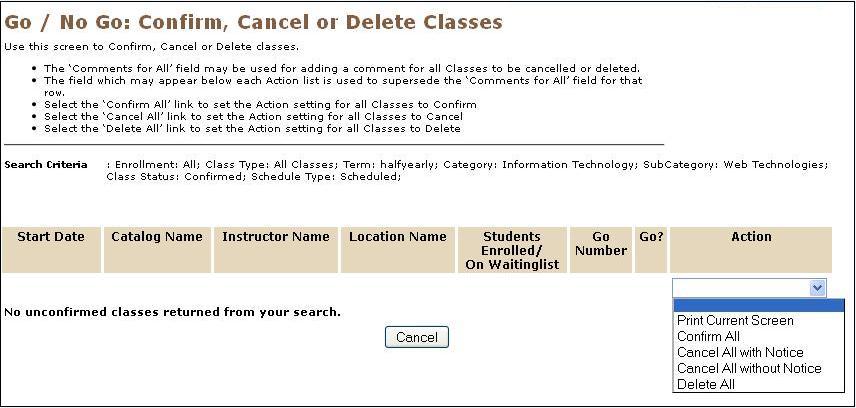
5. To change multiple class status, use the upper right action drop down box. For multiple class status change, options will be: Print Current,
Screen, Confirm All, Cancel All, Delete All.
6. Selecting Print Current Screen will open a new browser window with a print-ready format.
7. Selecting Confirm All—All the active classes will be confirmed, if the number of enrollments has met or exceeded the Go Number.
If necessary, you may also confirm classes that have not met their Go number. Other status like, cancelled, deleted, run will remain unchanged even after selecting "Confirm All".
8. Selecting 'Cancel with Notice' and 'Cancel without Notice'—Use the "Comments for All" field if the change reason will be the same for the classes being cancelled. If it differs, add
comments for individual classes.
9. Selecting Delete All—You may delete the class if the students enrolled is '0'. Action will stay as "No change" for classes with current
enrollments. You may use "Comments for all" field if the change reason will be same for all classes being deleted. If they differ, use the individual
"Comments" field provided under each class listed.

10. Once, Confirm All, Cancel All or Delete All is selected, the Action column will update for each class.
11. Once appropriate actions have been selected and all comments have been entered, click "Submit" to save the changes.
12. After cancelling or deleting multiple classes, a pop-up box for verification will be returned as shown below, which will not appear in case
of confirming multiple classes. Click Submit again.
13. Confirmation page on confirming class:

14. Confirmation page on cancelling class: You can also see the reason for deleting class in the form of comments (Low Enrollment). Comments
can also be edited from this point.

15. Confirmation page on deleting class: You can also see the reason for deleting class in the form of comments (Low Enrollment). Comments
can also be edited from this point.

16. Selecting the "Print" button will open a new browser window with a print-ready format of the Go / No Go class status change confirmation
screen as shown below.
