APPENDIX C |
The Merge Block feature is used to display repeating elements such as classes, contract items, billing terms,etc. This is accomplished by adding a single row table having one or more columns to your document, adding the fields into the table and formatting it as you wish it to appear. When the data is merged, a new row for each item will appear in the output.
From the Document Editor:
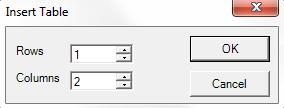
Click Table, Insert, Table and select one (1) row and however many columns your design requires.
The reason you want to choose one row verses two or more is because it will auto-populate according to the information.
The computer will do the work for you.
Once you have the table, you will want to place a field value and/or other text in each cell.
Click Mail Merge.
Click Insert Merge Fields.
You can choose more than one field in a cell and increase the size of the cell by using the enter key on the
keyboard.
![]()
Select the whole table or all the contents in the table.
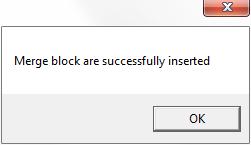
Click Mail Merge, Insert Merge Block.
You will get a pop-up dialog box when successful. There will be no other visual indicators on the template that shows the merge block other than by selecting the menu Mail Merge, Edit Merge Block. Here you will be able to locate existing merge blocks.
The same instructions for Merge Fields applies here.
Select the proposal from the list of Proposals and click Proposal Document.
Click on Show saved templates if the panel is not showing.
Click the template with the table just created
Click Preview.
Click Save as PDF file.
The document will be stored in Document Archives.
To make changes to the table in Document Editor.
Select the template from the Show Saved Templates.
Click Mail Merge, Edit Merge Block.
This will allow you to see if this feature has been applied.
Select merge field you want to delete.
Click Mail Merge in the menubar, and click Remove Merge Field.
Underlying codes may exist if the contents in the cell is selected and deleted which may cause problems.