REGISTRATION & STUDENTS | Student Management |
(These instruction are for Staff Members)
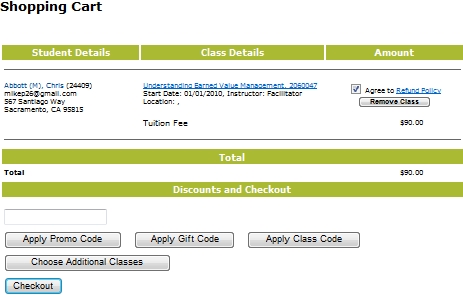
Click Checkout on the Shopping Cart screen. A list of payment options will be displayed, which include:
Paying by Cash or Check
Paying by Credit Card or Credit Card Terminal
Underpayment
Overpayment
Split Payment
Accounts Receivable
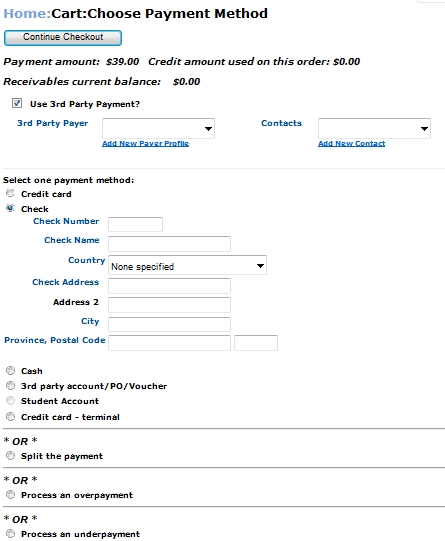
Third Party Payment
When cash is used as a method of payment, click the Cash option, then Continue Checkout. The Payment Processing page will open stating your transaction has been processed successfully with options to print receipt and confirmation(s).
When the Check option is selected, the name and address information will auto-populate. Enter a value in the Check Number field. Click Continue Checkout. The Payment Processing page will open stating your transaction has been processed successfully with options to print receipt and confirmation(s).
When the credit card is used as a method of payment, click Credit Card option, then Continue Checkout. The Payment Processing page will open.

Select the type of the credit card that will be billed from the Card Type drop-down list.
The name and address will auto-populate with student information. It can be changed if the student and the cardholder are different people.
Enter the credit card number in the Card Number field.
Enter the date the credit card expires in the MMYY format in the Card Expiration Date field.
Enter the three/four digit security number in the Card ID (CVV2/CID) Number field. Click the What is the Card ID? link for more information on the security number.
Click Process Payment. The Payment Processing page will open stating your transaction has been processed successfully with options to print receipt and confirmations.
|
|
Note: Credit Card Terminal is used as an alternative method of credit card payment. Credit Card Terminal only updates Lumens. In a registration, staff must manually enter credit card information into credit card information into credit card gateway using the virtual terminal. If cancellation, can apply quick credit. However, when selected, click Credit Card Terminal then click Continue Checkout. The Payment Processing page will open stating your transaction has been processed successfully with options to print receipt and confirmations. |
If a student has paid more than the transaction requires, you can process an overpayment, allowing you to accept the payment in full, but refund or waive the difference between the transaction total and the payment amount.
Select Process an overpayment and then click Continue Checkout. The Overpayment page opens.

Enter the total payment amount in the Payment Amount field (Lumens automatically calculates the refund amount from the total payment).
Select the payment method. In this example, the student gave a hundred dollar bill in cash, which is overpayment.
Select the refund method you would like to use, or select 'Do not refund for overpayment'.
Click Continue Checkout. The Payment Processing page will open stating your transaction has been processed successfully with options to print receipt and confirmation(s). This transaction is recorded as a miscellaneous charge.
If a student has paid less than the transaction requires, you can process an underpayment, allowing you to accept the payment, and automatically waive the difference (the amount owed). Use the underpayment option only if you wish to waive the difference between the amount of the order and the payment.
Select Process an underpayment and then click Continue Checkout. The underpayment page opens.

Enter the amount of the underpayment in the Payment Amount field.
Select the payment method. In this example, the credit card was denied for anything over $50.00, thus having an underpayment. When an underpayment is accepted, the amount of the underpayment is recorded as a miscellaneous credit.
Click Continue Checkout. The Payment Processing page will open stating your transaction has been processed successfully with options to print receipt and confirmation(s).
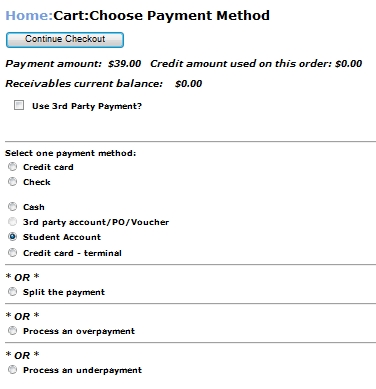
When a Staff Member registers a student without requiring payment, Staff can select Student Account. This allows the student to be billed and pay later. Click the Student Account option, then Continue Checkout. The Payment Processing page will open stating your transaction has been processed successfully with options to print receipt and confirmation(s).
When the Split the payment option is selected, a screen similar to the one below will appear.

The screen is divided into 2 sections with the same payment methods to choose from.
1. In the Payment (1) section, enter an amount in the Payment Amount field. Then, Choose one payment method:
Credit Card
Check
Cash
3rd Party Account/ PO/Voucher
Student Account
Credit Card terminal
2. In the Payment (2) section, enter an amount in the Payment Amount field for the second type of payment. The payment options will detail the same process as described in this section.
Click Continue Checkout. The Payment Processing page will open stating your transaction has been processed successfully with options to print receipt and confirmation(s).
|
|
Note: If payment is made with 2 credit cards, the system does not allow for 2 online credit card payments. The work-around is to select Credit Card, and Credit Card Terminal. When the transaction is complete, Staff would go to the payment gateway and make payment through the virtual terminal. |
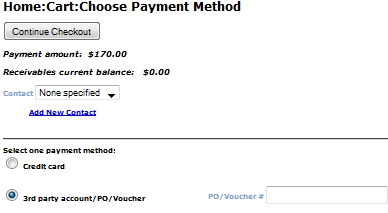
The process of 3rd Party Pay is unique compared to the other payment methods. A student can request his/her company to pay for a class. This feature allows a company and/or staff to manage requests.
STAFF REGISTERING A STUDENT
A staff member who registers a student with 3rd Party Pay is not required to enter a PO/Voucher number. Lumens will allow the registration to continue. Lumen's will allow the staff member to go back into the system at a later time and post the number.
When the box is checked for Use 3rd Party Payments text box option will appear. Use the arrow to select the 3rd Party Payer company and the contact person from the list.
Enter the PO/Voucher # number or code in the Select one payment method section. (This is not required).
Staff can also add new payer and/or new contact on the spot.
Click Continue Checkout. The Payment Processing page will open stating your transaction has been processed successfully with options to print receipt and confirmation(s).
STUDENT REQUESTING 3rd PARTY PAYMENT FOR A CLASS
The student can make this request following these steps:
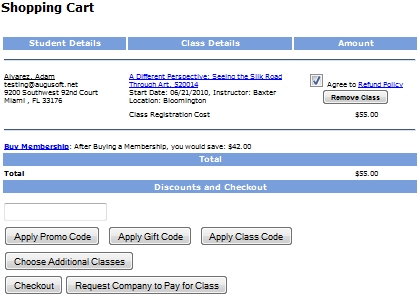
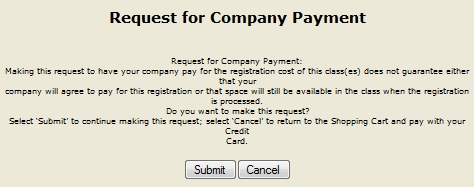
Click Request Company to Pay for Class.
The Request for Company Payment screen will appear, click Submit.
Click update your profile to change or select your company.
|
|
Note: If the company is not in the drop-down list or in student profile, the request cannot be completed. |
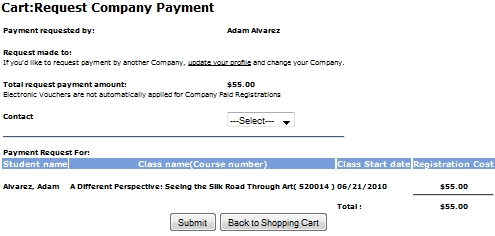
A screen will appear with a list of companies, Select company and then click Submit.

Select a contact from the Contact list, click Submit.
A Request Submitted screen will appear, and an email is sent to the company and the company contact.
COMPANY REGISTERING A STUDENT
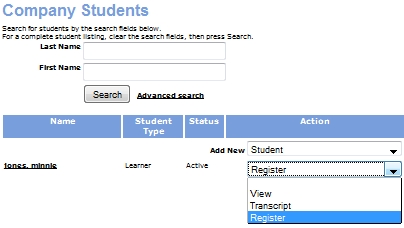
Companies can also register students however, employee must be in Lumens and the company name attached to the profile. The company can add a student by selecting Students from the sidebar, click Add New and proceed to enter data. Click Submit when completed. Notification will be automatically sent to the contact person at the institution. Once staff creates the student profile, student will appear in the company's Student list. From there, the registration can be completed.
To register a student, the company will click Students from the sidebar and select Register from the drop-down arrow next to the student's name on the list.
Find the class
Click Add to Cart,
Click Checkout in Shopping Cart
Click Checkout.
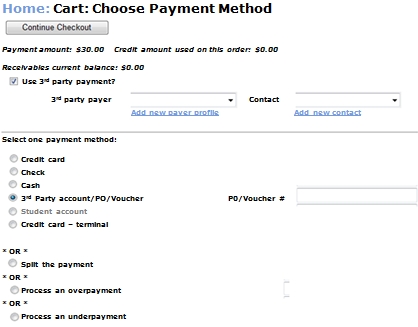
Click 3rd party account/PO/Voucher and enter PO/Voucher # number. PO/Voucher is required.
Click Continue Checkout. The Payment Processing page will open stating your transaction has been processed successfully with options to print receipt and confirmation(s).